
Photographers: Upload Photos From Your Phone, Publish Shoots Same Day
Photographer workflow to upload photos from your phone fast: USB, wireless sharing, or cloud backup, then import to Lightroom and publish.
Photographers: Upload Photos From Your Phone, Publish Shoots Same Day
For bulk, full-resolution transfers, use a data-capable USB cable and import through your computer’s native photo app. For sharing a handful of shots on the spot, AirDrop or Quick Share beats everything else on speed. For ongoing protection so you never lose a shoot again, set up cloud camera uploads and let them run in the background.
TL;DR:
- Wired USB transfer remains the most reliable way to move full-resolution images without compression, requiring a data-capable cable and manual import.
- AirDrop and Quick Share are the fastest options for transferring small batches locally, but both require devices to be close and discoverable via Bluetooth or Wi-Fi.
- Cloud uploads automatically back up photos in real-time but can compress images unless set to original or best quality, which may fill up free storage quickly.
- Third-party apps like PhotoSync support RAW files, NAS backup, and scheduled transfers but should be used when native tools no longer meet volume or automation needs.
- Preselect and organize photos on the phone before upload, and ensure device permissions are correctly set to avoid transfer failures and optimize workflow efficiency.
Table of Contents
- Quick Shortlist: Choose a Method in 10 Seconds
- How to Transfer Photos via USB (Windows and Mac Basics)
- Local Wireless Transfers: AirDrop, Quick Share, and Phone Link
- Cloud Camera Upload Options and Settings
- When and How to Use Third-Party Transfer Apps
- Best Practices Before You Upload
- Common Problems and Fixes
- How Photographers Use Mobile Imports as Part of a Bigger Workflow
- A Working Photographer’s Take on Transfer Habits
- Try PhotoView After Your Photos Are Uploaded
- Sources
- FAQ
Quick Shortlist: Choose a Method in 10 Seconds
Match the method to the job, not the other way around. Each option trades speed for control differently, and knowing which trade-off you’re making saves you from a corrupted folder or a compressed portfolio shot later.
- Wired USB: best for bulk transfers and full-resolution originals; needs a data-capable cable and either PC import or manual file copy.
- AirDrop / Quick Share: fastest option for one photo or a small batch; both devices need to be close and discoverable.
- Cloud uploads: best for continuous backup and pulling images up on any device later; watch your quality settings so you don’t get a compressed copy by default.
- Third-party apps: worth adding when you need NAS support, RAW file transfers, or automated local network backups that built-in tools don’t cover.
How to Transfer Photos via USB (Windows and Mac Basics)
A wired transfer is still the most reliable way to move a full memory card’s worth of images without touching your Wi-Fi speed or storage caps. It also guarantees you get the original file, untouched by any compression algorithm.
On Windows:
- Connect your phone with a cable that supports data transfer, not just charging.
- Unlock the phone screen. On iPhone, tap Trust This Computer when prompted; on Android, set the USB mode to file transfer (MTP).
- Open Windows Photos and import directly, or open File Explorer and drag files manually if you want more control over folder structure.
Use Photos import when you want automatic date sorting and a simple review screen. Use manual copy when you’re archiving to a specific folder structure for client work.
On Mac, iPhone users have three solid paths: Image Capture for a no-frills drag-and-drop, the Photos app for automatic library organization, or downloading originals through iCloud if photos are already synced.
Pro Tip: Keep one known-good data cable in your camera bag specifically for transfers. Charging cables that skip the data wires are the number one reason a phone won’t show up on your computer.
Local Wireless Transfers: AirDrop, Quick Share, and Phone Link
When you only need a few images and don’t want to plug in anything, local wireless sharing is faster than any cloud upload because it skips the round trip to a server entirely.
AirDrop, for iPhone-to-Mac or iPhone-to-iPhone transfers, works by turning on AirDrop in Control Center on both devices, selecting photos, and tapping the recipient’s name when it appears.
Quick Share and Nearby Share (Android’s equivalents) discover nearby devices over Bluetooth, then move the actual files over a direct local Wi-Fi connection, which is why large batches transfer quickly without touching your data plan. Both devices need Bluetooth, location, and Wi-Fi enabled, and the receiving device needs to be set to visible or receiving mode.
- Confirm both devices have wireless features turned on before searching for a nearby device.
- Set the receiving device to visible or “everyone” mode temporarily.
- Check where received files land. Quick Share typically saves to a dedicated downloads or received-files folder.
Phone Link adds a middle ground for Windows users: it mirrors your phone’s recent photos onto your PC desktop for quick grabs, without a full import.
Cloud Camera Upload Options and Settings
Cloud uploads solve the problem wired and wireless transfers don’t: protecting photos the moment they’re taken, before a lost or damaged phone becomes a lost shoot. Google Photos, OneDrive, and iCloud all offer automatic camera uploads once you enable them in the app settings and confirm the upload indicator shows active syncing rather than paused.
The setting that trips people up most is quality. Many services default to a compressed or “optimized” mode to save storage space, which quietly reduces resolution unless you switch to “original” or “best quality.” OneDrive specifically lets you choose between good and best quality, and its desktop client can handle files up to 20GB.
- Enable camera upload in the app’s settings menu, then check the sync status to confirm it’s running.
- Select original or best quality if you plan to edit or print later.
- Download originals through each service’s desktop app or web interface rather than a mobile share sheet, which sometimes recompresses on the way out.
Free storage tiers fill up fast once you’re shooting regularly, and most photographers end up paying for expanded storage within the first year of consistent uploads.
When and How to Use Third-Party Transfer Apps
Built-in tools cover most people, but they fall short if you need a NAS backup, RAW file support, or a transfer that happens automatically without you opening an app.
PhotoSync is a solid example: it moves files over local Wi-Fi to a PC, Mac, or NAS, supports RAW formats most native apps ignore, and can run scheduled backups in the background.
- Prioritize apps that support local Wi-Fi transfers so you’re not depending on cellular data or a cloud middleman.
- Check for NAS or SMB compatibility if you’re backing up to a home server.
- Look for RAW file support if you shoot on a phone with a pro camera mode.
Pro Tip: Before enabling any third-party app, check its library access setting. Most default to full library access when you only need it to see your camera roll.
Stick with built-in methods for occasional transfers. Add a third-party app only once your volume or backup needs outgrow what your phone’s native tools offer.
Best Practices Before You Upload
A few habits before you hit upload save you from re-shooting, re-sorting, or re-exporting later.
- Choose the destination by purpose. Send originals to a folder you’ll edit from; send compressed copies to anything meant purely for quick sharing.
- Limit app permissions where you can. Full library access is rarely necessary, and reviewing which apps can see your photos prevents accidental exposure of images you never meant to share.
- Rename and organize before uploading, not after. A batch rename by date or shoot name takes thirty seconds on the phone and saves you from sorting through “IMG_4821.jpg” later.
- Keep redundant backups. A single cloud copy is not a backup strategy. Pair it with a local copy on an external drive or computer.
Common Problems and Fixes
Most transfer failures trace back to one of four causes, and each has a quick fix.
- Phone not detected over USB: swap the cable first. A charging-only cable is the most common culprit, followed by a bad port.
- No trust or permission prompt appears: unlock the phone screen and check for a hidden notification asking you to trust the computer or allow photo access.
- iCloud photos show as blank or low-res: this usually means “Optimize Storage” is on. Download originals directly or install iCloud for Windows to pull full-resolution copies.
- Upload stuck or crawling: check that Wi-Fi is connected (not just cellular), disable aggressive battery-saver modes, and confirm the app isn’t paused in a background upload queue.
How Photographers Use Mobile Imports as Part of a Bigger Workflow
Uploading is rarely the finish line for working photographers. It’s the first step before culling, editing, and publishing. A typical flow looks like this: import from phone to a working folder, cull and export the keepers in your desktop editor, then push the finished set into curated galleries clients can actually see.
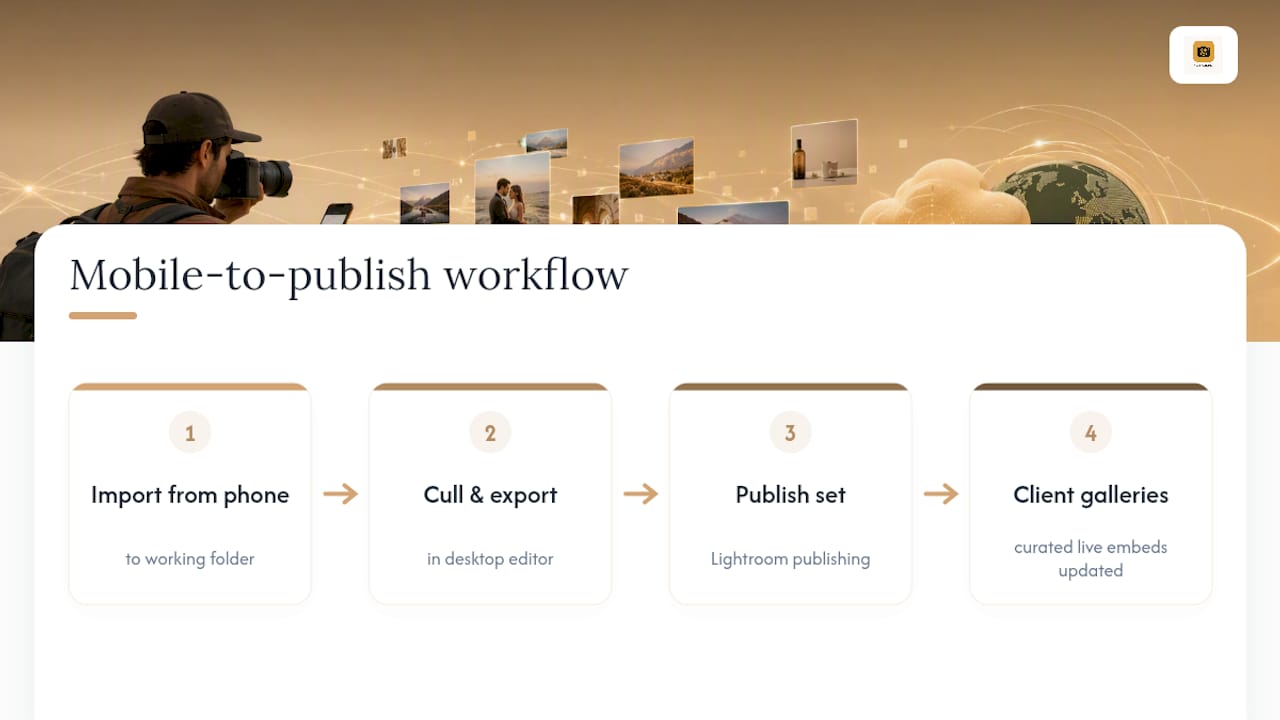
PhotoView fits into that last stretch. Once images are uploaded and edited, Lightroom publishing pushes finished sets straight into a gallery, and Smart Folders keep live embeds updated automatically as you add new work. For a closer look at moving phone images into a polished portfolio, PhotoView’s guide on mobile photo import for photographers walks through the full sequence.
A Working Photographer’s Take on Transfer Habits
The method matters less than the habit. Cloud backup running the moment you shoot, followed by a wired bulk export before real editing begins, catches almost every failure point in between. One small routine pays off disproportionately: preselect favorites on the phone itself, before you even touch a computer. It turns a folder of five hundred images into a shortlist of forty before you’ve opened a single editing tool.
— Mitch Russo
Try PhotoView After Your Photos Are Uploaded
Getting photos off your phone is only half the job. Once they’re on your computer, PhotoView gives you a place to store, curate, and present the finished set without wrestling with website code or a clunky content management system.

Import straight from Lightroom once you’ve edited your uploads, drop new sets into Smart Folders so your live site updates on its own, and choose from more than 30 responsive templates built for how photographers actually show work. If you’re curious what that looks like in practice, browse a live example portfolio or see how PhotoView stacks up against typical workflows on the platform comparison page. For post-upload editing on the go before you publish, quick smartphone video editing tools pair well with a mobile-first workflow. Start a free trial at Photoview and get your next shoot online the same day you shoot it.
Sources
- Import photos and videos from phone to PC | Microsoft Support
- Send files & photos Android to Android via Quick Share | Android
FAQ
What’s the Easiest Way to Transfer Photos From Your Phone?
For most people, a data-capable USB cable and your computer’s native photo importer is the simplest reliable method, since it needs no app setup and preserves full resolution.
What’s the Best Way to Upload Photos for Backup?
Cloud camera upload through Google Photos, OneDrive, or iCloud is best for ongoing backup, as long as you select original or best quality instead of the default compressed setting.
Where Can I Upload All My Photos From My Phone?
Google Photos, OneDrive, and iCloud all support automatic camera uploads, and photographers who want a public-facing home for finished work can publish curated sets through PhotoView after editing.
What’s the Easiest Way to Upload Photos From an iPhone?
Connect the iPhone with a data cable, tap Trust This Computer, and import through Windows Photos or Image Capture on Mac; for wireless transfer to another Apple device, AirDrop is faster than any cloud step.